
Garden Organization Ideas: 29 Tricks for a Tidy Shed
A cluttered garden shed can make even the simplest gardening task feel frustrating. Tools get buried, seed packets disappear and useful supplies take up more space than they should.
These Garden Organization Ideas will help you turn a messy shed into a tidy, practical space where everything has a place. From wall mounted tool racks and labeled storage bins to clever shelving solutions and compact potting stations, you’ll discover simple ways to organize your supplies without spending a fortune.
Whether you have a small garden shed packed with equipment or a larger space that needs a better storage system, these ideas offer practical inspiration for every gardener. Small changes, such as grouping similar tools together or using vertical space, can make everyday gardening easier. Explore these 29 tricks, choose the solutions that suit your space and create an organized shed that stays functional throughout the gardening season.
Wall Mounted Tool Racks
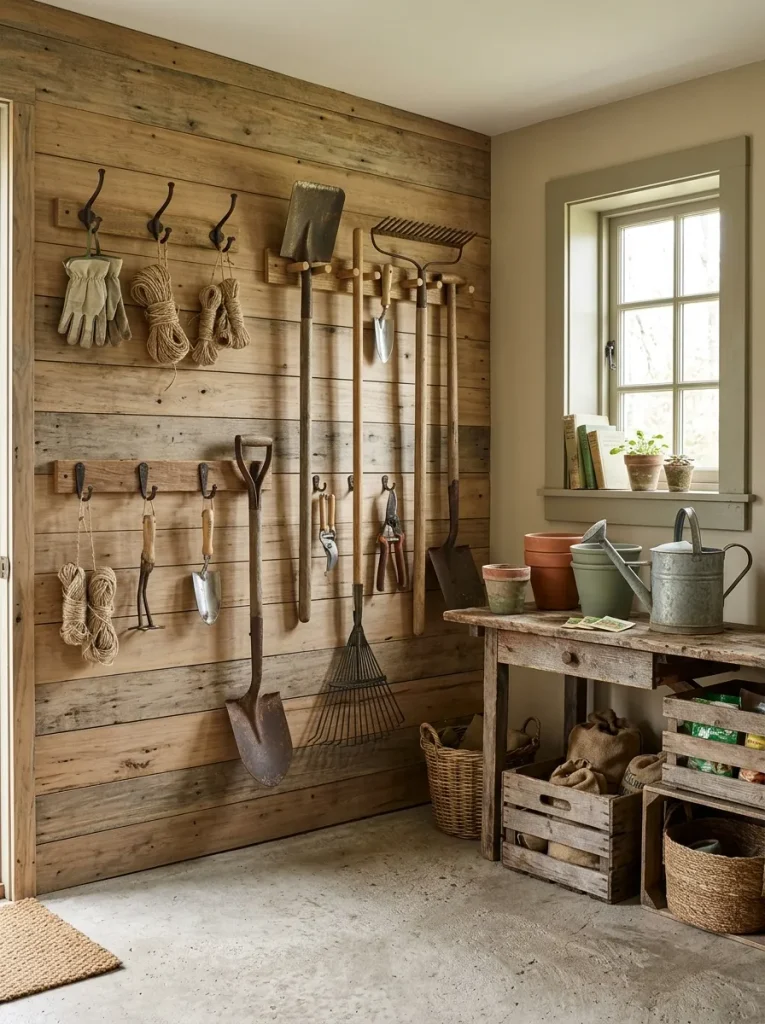
Garden tools scattered across the floor can make even a spacious shed feel cramped. Wall mounted racks offer a simple solution by turning unused vertical space into organized storage. Hang long handled tools such as rakes, shovels and hoes in a single row, keeping their handles easy to reach and their working ends safely off the ground.
For smaller tools, add a narrow rail with sturdy hooks or a compact pegboard nearby. Group similar items together so you can find what you need without moving everything else. Leave a little space between each tool to make returning items after gardening quick and convenient.
Labeled Storage Bins

Loose seed packets, plant ties and gardening accessories can quickly turn a shelf into a cluttered mess. Labeled storage bins give every small item a dedicated home, making it easier to find supplies when planting season arrives. Choose clear containers when you want to see the contents immediately or use matching opaque bins for a cleaner appearance.
- Seeds: Store packets together in a dry, cool location.
- Plant labels: Keep reusable markers and labels in one small bin.
- Gloves: Separate clean pairs from muddy or damp ones.
- Twine and ties: Use shallow containers to prevent tangles.
- Small accessories: Group items such as clips, tags, and ties by purpose.
Place frequently used supplies on shelves at eye level and reserve higher shelves for lightweight items you rarely need. Add large, easy-to-read labels to the front of each container. This small change makes daily gardening routines smoother and helps everyone in the household return supplies to the right place.
Vertical Shelving

Quick Tip:
Measure your shed’s available wall space before buying shelves, then choose a sturdy unit that fits without blocking doors or windows. Keep heavy pots, soil bags and other bulky supplies on lower shelves, and place lightweight accessories higher up.
Vertical shelving helps you make better use of a small garden shed without crowding the floor. Adjustable shelves are especially useful because pots, watering cans, and seasonal supplies come in different sizes. Leave enough room to remove items comfortably, and avoid stacking heavy containers above shoulder height. A well planned shelving system keeps essentials visible, protects delicate supplies, and makes even a narrow shed feel more manageable.
Read More: Garden Path Ideas: 25 Winding Walkways You’ll Wander
Repurposed Wooden Pallets

Old wooden pallets can become useful storage features with very little expense. A securely mounted pallet creates narrow compartments for lightweight garden tools, empty pots and frequently used accessories. Sand rough edges, remove protruding nails and check that the wood is sturdy before bringing it into your shed.
- Clean the pallet thoroughly and allow it to dry.
- Sand splintered surfaces and apply a suitable protective finish.
- Secure it firmly to wall studs or another appropriate support.
- Add hooks or small containers for tools that might otherwise fall through gaps.
This approach works particularly well in rustic sheds where practical storage matters more than perfectly matching furniture. Keep heavy equipment elsewhere and avoid using damaged or chemically treated pallets for storage that could contaminate gardening supplies.
Hanging Basket Storage
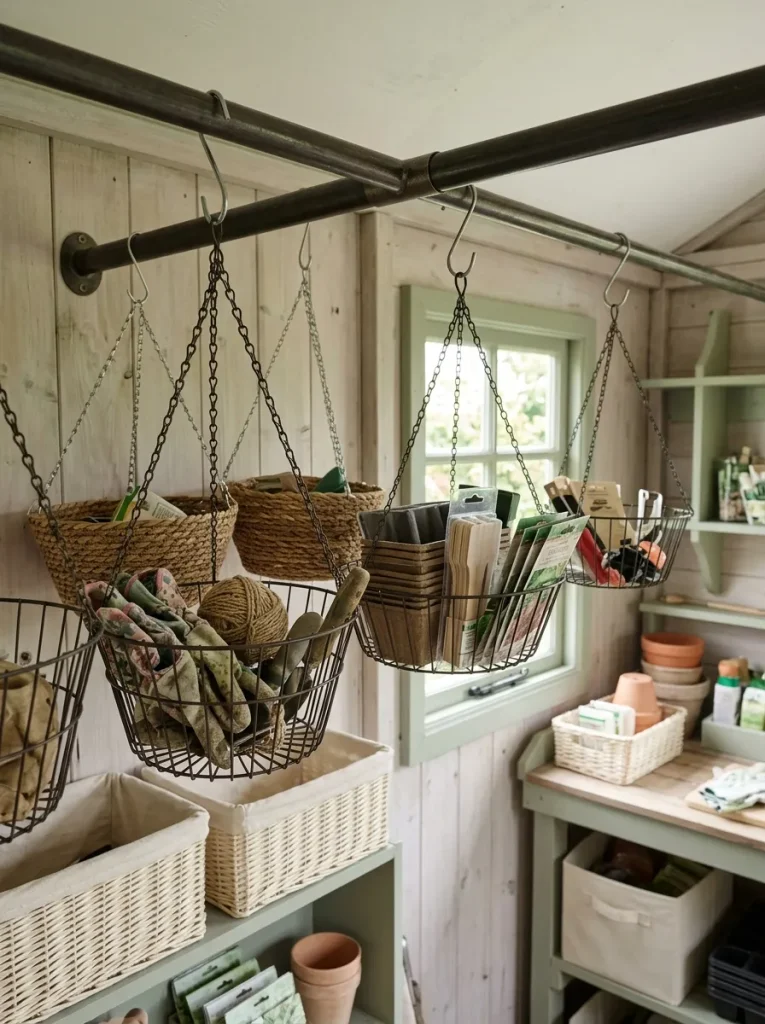
Empty baskets and lightweight supplies can take up valuable shelf space when they are stored in piles. Hanging baskets move these items upward, leaving more room for potting soil, larger containers and everyday tools. Choose baskets with sturdy handles and suspend them from a properly supported rail or suitable ceiling hooks.
- Sort supplies by category before assigning each basket a purpose.
- Place frequently used accessories in the easiest baskets to reach.
- Keep heavier items on low shelves rather than overhead.
- Label the baskets so their contents remain easy to identify.
The key is to keep hanging storage light and accessible. This system is especially helpful in narrow sheds where every shelf matters. Avoid hanging baskets above work areas where items could fall onto someone, and make sure the support can safely carry the combined weight.
Stackable Plant Pots
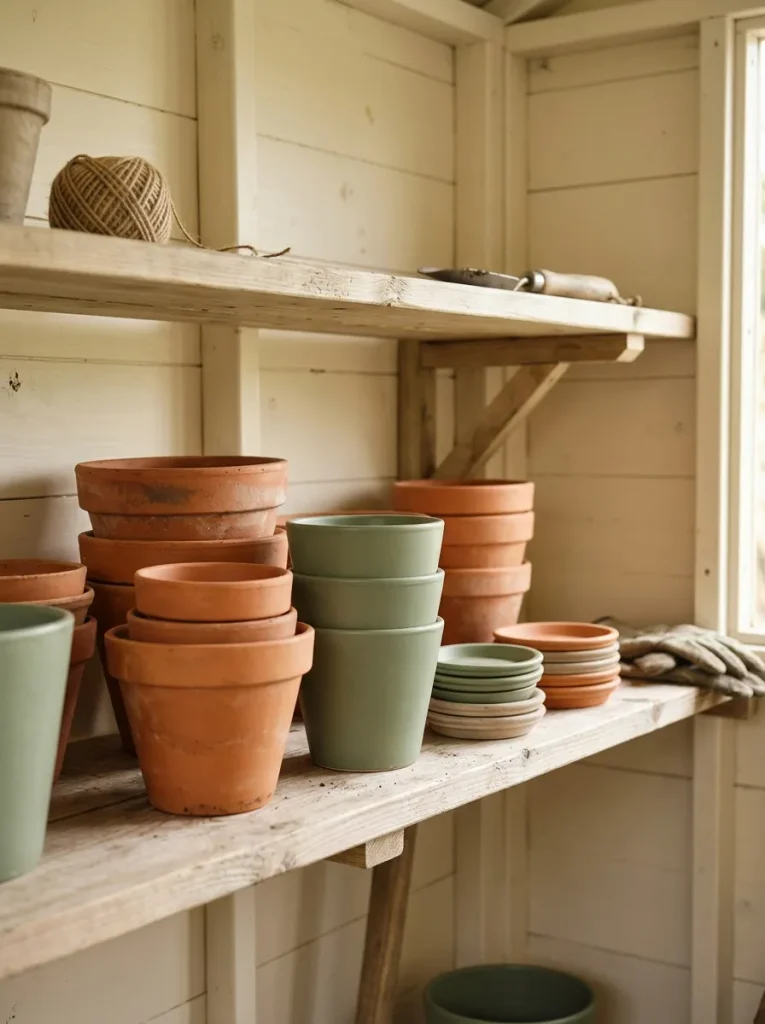
A collection of mismatched plant pots can quickly become a bulky pile. Nesting pots by size reduces the space they occupy and makes it easier to select the right container when repotting plants. Before stacking, remove loose soil and check that each pot fits securely inside the next.
- Group terracotta pots separately from plastic and ceramic containers.
- Stack pots from largest to smallest.
- Place drainage trays in a separate, flat pile.
- Keep fragile ceramic pots on stable shelves away from heavy tools.
In my experience, organizing pots by material and size makes seasonal planting much less frustrating. You’ll spend less time searching through unstable stacks and more time choosing containers for your plants. Keep a few frequently used pot sizes near your potting bench, and store decorative or rarely used pots higher up.
Pegboard Tool Wall

BEFORE
Small tools often disappear into drawers, boxes, or crowded shelves. Finding a pair of pruning shears may mean moving several other items, while frequently used tools end up scattered across the workbench.
AFTER
A pegboard gives each tool a visible place. Hooks and small attachments can be rearranged as your collection changes, keeping essentials easy to reach and the work surface clear.
Mount the board securely above your potting bench and choose hooks designed for its material and the weight of your tools. Outline frequently used tools on the board if you want an extra reminder of where everything belongs. This arrangement is particularly useful for gardeners who own many small hand tools but have limited drawer space.
Rolling Storage Cart

- Choose the cart: Measure the aisle and select a model that can move comfortably through the shed.
- Assign the tiers: Place heavier supplies on the bottom shelf, everyday tools in the middle, and lightweight accessories on top.
- Organize the contents: Use small containers to prevent loose items from rolling around.
- Position it nearby: Park the cart beside your potting bench or another regular work area.
A rolling cart keeps essential supplies together while allowing you to move them wherever they’re needed. It can be especially helpful when planting several containers or working in different parts of the garden. Choose locking wheels for stability and keep the cart balanced so it doesn’t tip when moved over uneven surfaces.
Repurposed Mason Jars
DO
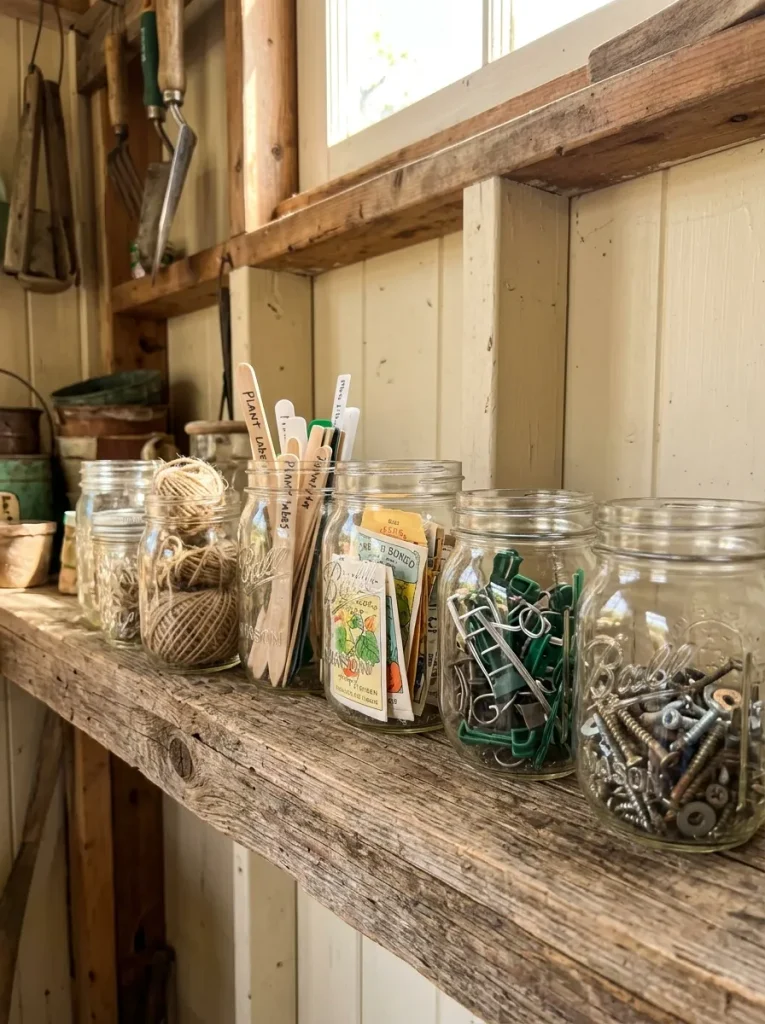
- Use clean, dry jars for small items such as plant labels, clips, and twine.
- Group jars by purpose and keep them together on a stable shelf.
- Add clear labels so contents are easy to identify.
- Keep sharp or pointed objects in secure containers with appropriate lids.
DON’T
- Don’t place heavy glass jars on unstable or crowded shelves.
- Don’t store damp seeds or wet accessories in sealed jars.
- Don’t leave glass containers where they could fall and break.
- Don’t use open jars for tiny items if they may spill easily.
Repurposed jars make use of containers you may already have at home. They are especially practical for gardeners who accumulate small accessories that are otherwise difficult to organize. Keep them away from busy edges and direct impacts and choose plastic containers instead when breakage is a concern.
Dedicated Potting Bench

A dedicated potting bench gives messy gardening tasks a defined place instead of spreading across every available surface. Choose a bench with a comfortable working height, a durable top, and storage underneath for pots, trays and soil supplies. A shallow drawer is useful for small tools that you reach for during nearly every planting session.
Keep the most frequently used items within arm’s reach and reserve lower shelves for heavier supplies. If you work with potting mix, use a removable tray or washable surface to collect loose soil. This setup makes repotting easier to manage and gives your shed a clear central workspace without sacrificing valuable storage.
Clear Stackable Containers
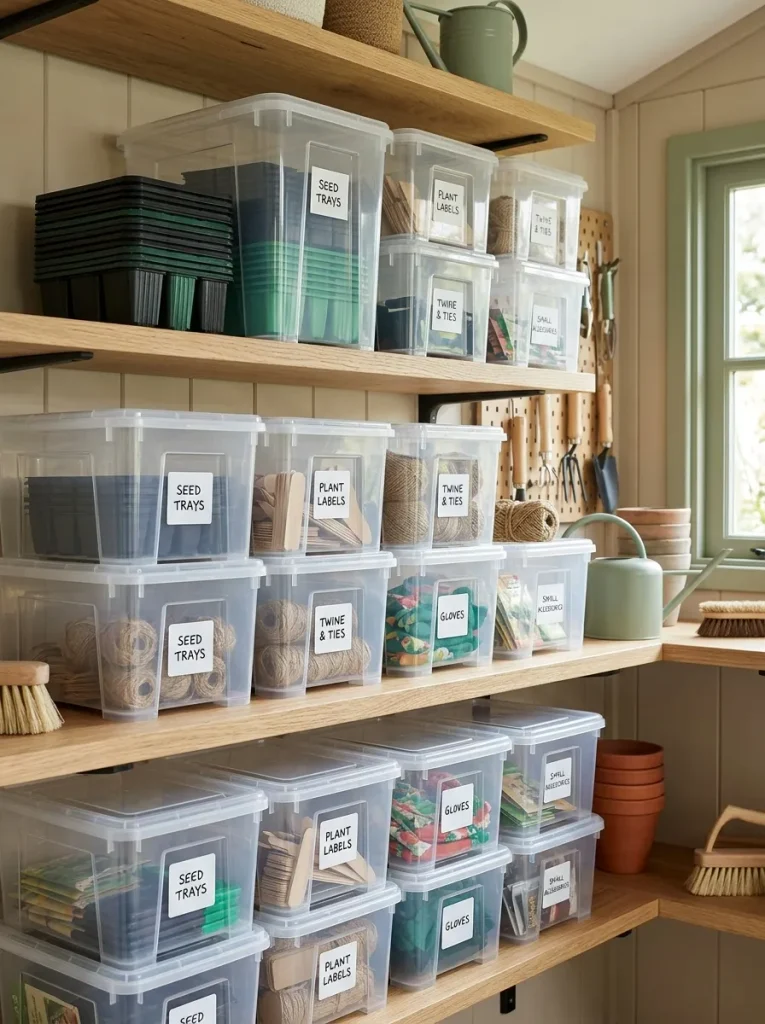
Quick Tip:
Choose containers with similar footprints so they stack securely without wasting shelf space. Use clear boxes for supplies you need to identify quickly, and label the front even when the contents are visible.
Clear containers help you see what you own before purchasing duplicates or opening several boxes. They are especially useful for seasonal accessories, spare plant pots and small tools that don’t need to remain on display. Keep frequently used boxes at waist or chest height, and store heavier containers lower down to reduce the risk of falling items.
Magnetic Tool Strips

BEFORE
Metal hand tools often collect in drawers or small buckets, where handles overlap and sharp edges become difficult to see. Searching for the right tool can interrupt a planting task and leave the bench cluttered.
AFTER
A suitable magnetic strip keeps compatible metal tools visible and within reach. The bench becomes easier to clean and individual tools can be returned to their designated spots after use.
Install the strip firmly at a convenient height and verify its weight rating before adding tools. Check that each item is held securely, especially when doors or walls may vibrate. Magnets won’t work for every tool, so keep wooden, plastic and unusually shaped items on hooks or in separate containers. Position sharp implements away from children’s reach.
Vertical Hose Holder
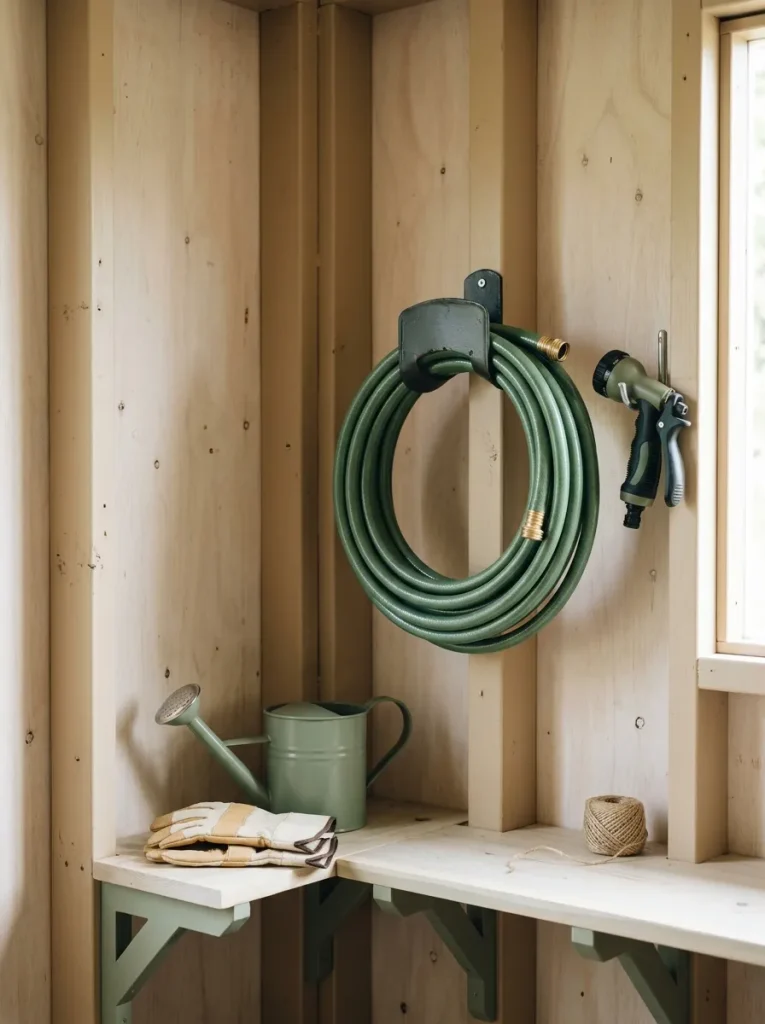
- Select the location: Choose a wall near the shed entrance or the point where the hose is regularly used.
- Check the support: Use a holder rated for the hose’s weight and mount it securely to suitable structural material.
- Drain the hose: Empty excess water according to the hose manufacturer’s guidance before storing it.
- Coil it carefully: Follow the hose’s natural curve to avoid kinks and unnecessary strain.
- Store attachments: Hang compatible nozzles and connectors on a separate nearby hook.
A wall-mounted hose holder prevents loose coils from spreading across the floor or tangling with other equipment. Keep the hose away from sharp edges and walkways, and avoid tight bends that could weaken it. For heavier or longer hoses, choose a holder designed specifically for that load rather than a lightweight decorative hook.
Drawer Dividers

Garden drawers are useful only when you can find what you need inside them. Dividers separate small supplies into dedicated compartments, preventing labels, clips, twine and hand tools from becoming one tangled collection. Adjustable inserts are helpful because your storage needs may change throughout the planting season.
Measure the drawer before buying organizers, then assign a compartment to each category of supplies. Place frequently used items near the front and less common accessories toward the back. You can also repurpose small, sturdy boxes as temporary dividers. The result is a more functional workspace where supplies stay separated and returning items takes only a moment.
Overhead Seasonal Storage
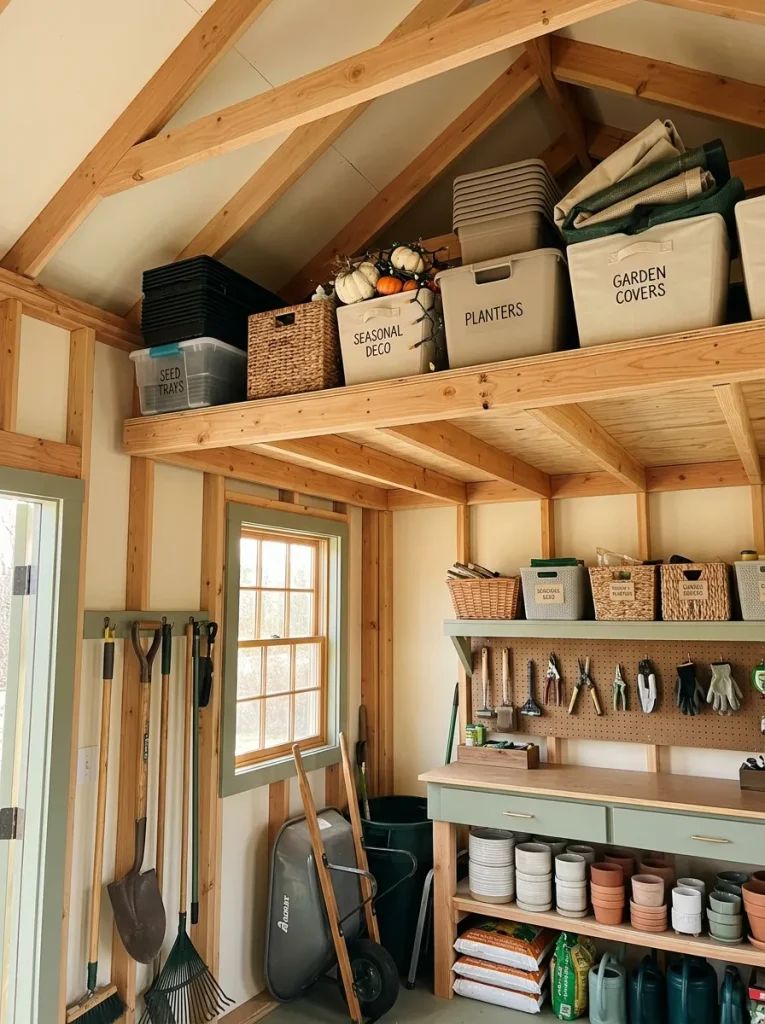
DO
- Reserve overhead shelves for lightweight items used only occasionally.
- Label containers clearly so their contents can be identified from below.
- Check the shelf’s load rating and secure it to suitable structural supports.
- Keep a safe, clear route for retrieving stored items.
DON’T
- Don’t store heavy soil bags, large pots, or machinery overhead.
- Don’t place boxes where they could slide or fall.
- Don’t block windows, lights, ventilation or the shed door.
- Don’t climb unstable chairs or stacked containers to reach high shelves.
Overhead storage can free valuable wall and floor space, particularly in a small shed. Use it for empty seasonal containers, lightweight covers or other supplies that you rarely need. Make sure everything remains safely reachable with an appropriate step ladder and bring items down carefully rather than stretching or lifting awkward loads above your head.
Seed Packet Organizer

Quick Tip:
Sort seed packets by plant type or planting season, then place older packets where you’ll notice them first. Check each packet’s storage instructions and keep seeds in the conditions recommended by the supplier.
A dedicated seed organizer prevents unopened packets from disappearing into drawers or getting mixed with general gardening supplies. Divided boxes, small filing organizers, or labeled envelopes can all work well, depending on the size of your collection. Add purchase dates when helpful and check germination information before relying on older seeds. A simple system makes seasonal planning easier and helps you locate the varieties you want to grow.
Folding Work Surface

BEFORE
A permanent table can dominate a small shed, leaving little room to move around or store larger equipment. When the table isn’t being used, its footprint may become wasted space.
AFTER
A securely mounted folding work surface provides room for potting, sorting seeds or cleaning small tools when needed. Folded away, it leaves more floor space available for other activities.
Choose a model designed for the intended load and install it according to its mounting instructions. Check that the wall structure and fasteners can support the table and the pressure created during work. Keep the folding mechanism clear of stored objects and avoid leaning heavily on the edge. This solution works best for lightweight tasks rather than heavy machinery or large soil bags.
Color-Coded Storage Zones

Option A: One Color Per Category
- Planting supplies: sage green
- Pots and containers: terracotta
- Gloves and protective gear: beige
- Small tools: charcoal
Option B: Matching Neutral Containers
- Use the same basket style across shelves.
- Identify categories with large written labels.
- Keep the visual appearance consistent.
- Separate supplies through dividers rather than color.
A color system is useful when several people share a garden shed or when supplies are stored across multiple shelves. Choose colors that are easy to distinguish in your lighting, and pair them with written labels rather than relying on color alone. The aim is to make each category recognizable at a glance while keeping the storage practical and easy to maintain.
Hanging Glove Organizer

Quick Tip:
Let damp gloves dry fully before placing them in closed storage. Use individual clips or a ventilated hanging rack so pairs remain together while air circulates around the fabric.
Gloves are easy to misplace because they often come off during quick tasks and get left on benches or tucked into pockets. A dedicated hanging area keeps pairs visible and prevents clean gloves from mixing with muddy ones. Arrange frequently used pairs at a convenient height, and separate heavy duty gloves from delicate planting gloves. This small organizational habit helps protect the material and makes it easier to find a suitable pair before starting work.
Reusable Crate Shelving
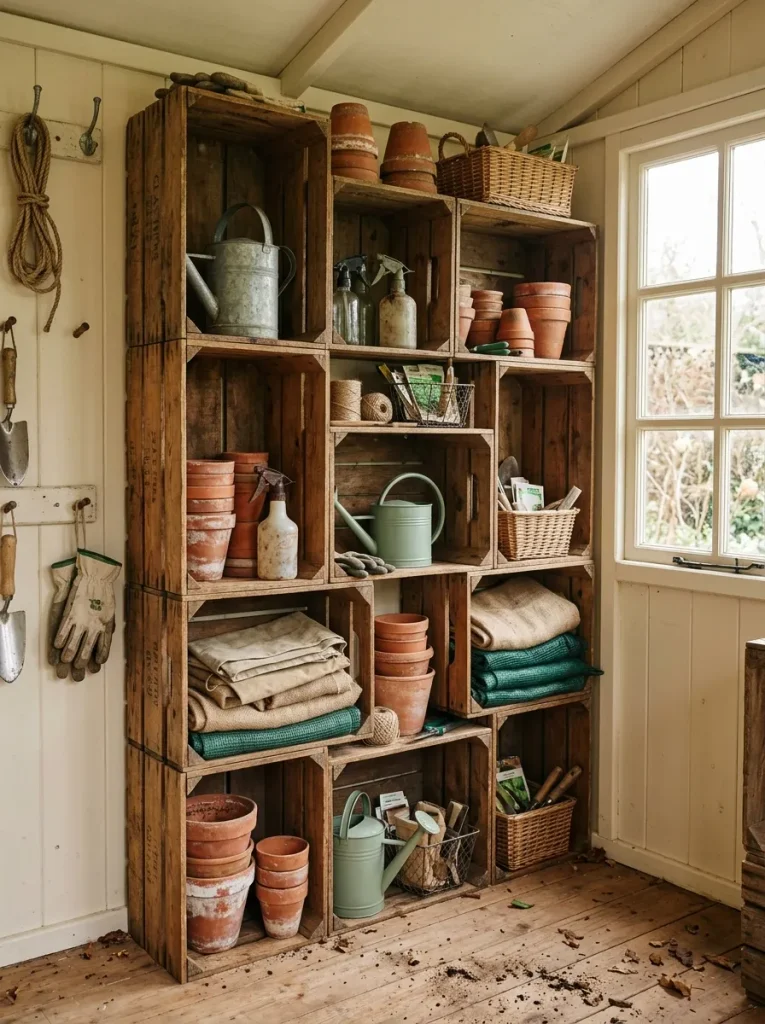
DO
- Choose strong crates that can safely support the intended contents.
- Arrange them on a level surface and secure the unit if needed.
- Store similar items together in each compartment.
- Place heavier supplies in the lowest crates.
DON’T
- Don’t use cracked crates for heavy equipment.
- Don’t stack unstable crates high without appropriate securing.
- Don’t leave sharp splinters or exposed nails.
- Don’t block access to tools stored behind the unit.
Reusable crates offer flexible compartments without requiring a custom shelving system. They can hold pots, small containers, folded fabric covers and other supplies that are awkward to arrange on open shelves. Measure the available wall space first and leave enough room to pull items out comfortably. A stable arrangement is more important than adding extra levels, especially when storing bulky gardening equipment.
Small Parts Drawer Cabinet
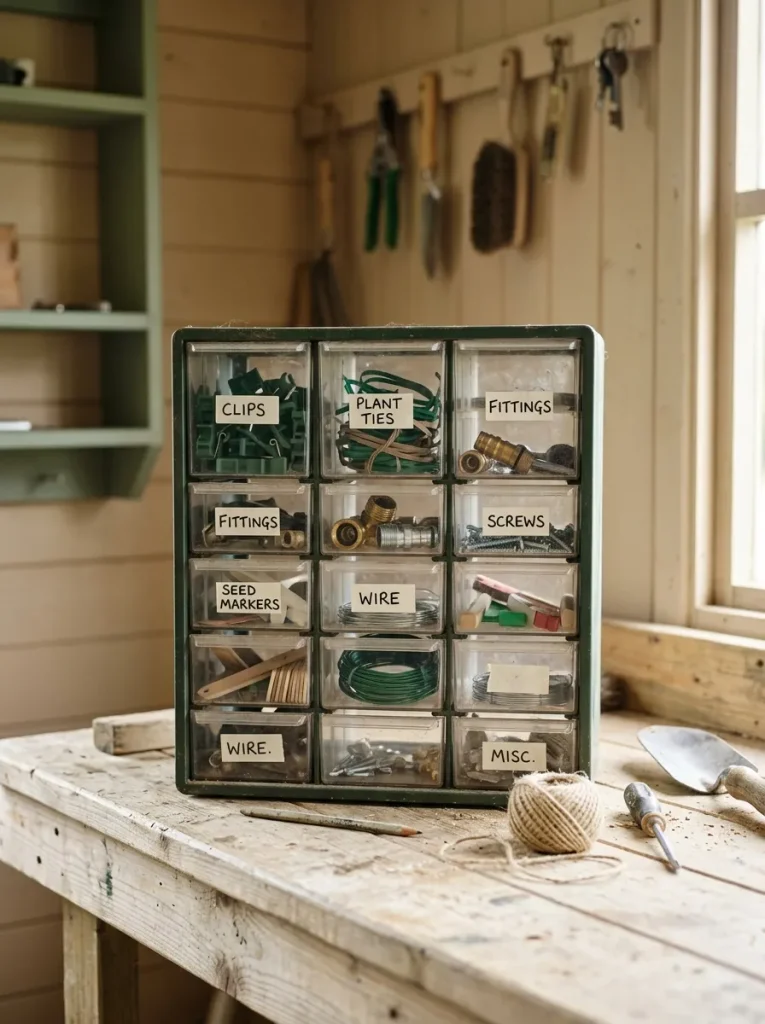
Tiny accessories can disappear surprisingly quickly when they’re stored together in a large box. A small drawer cabinet separates plant ties, clips, replacement fittings and other small supplies into clearly labeled compartments. Transparent drawers make identification easier, while opaque drawers can keep dust sensitive items protected.
Group items according to how you use them rather than simply by size. For example, keep plant supports and ties near one another and store spare fittings with the equipment they belong to when appropriate. Secure the cabinet so it cannot tip and avoid overfilling drawers. This compact organizer is particularly useful for gardeners who enjoy small repairs and maintain a growing collection of accessories.
Wheelbarrow Parking Area
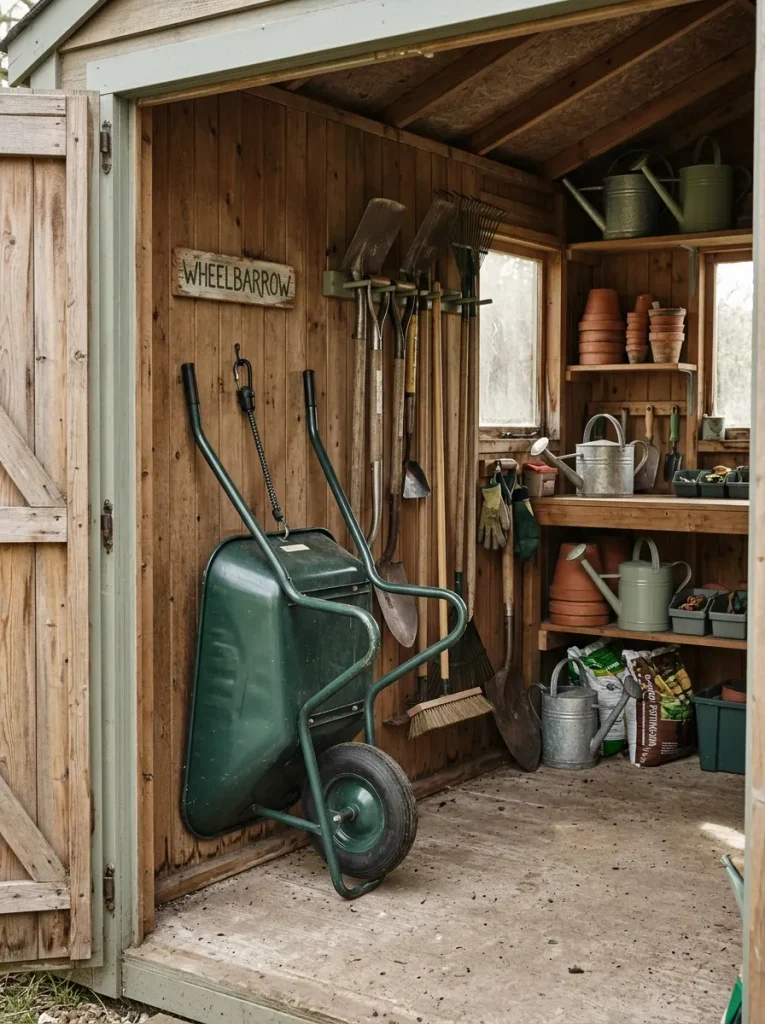
Quick Tip:
Measure the wheelbarrow’s full footprint, including its handles, before assigning a parking space. Keep the area clear enough to roll it in and out without moving other equipment.
A wheelbarrow can occupy a surprising amount of space when it is left in the middle of a shed. A designated parking area keeps it out of the main walkway and makes it easier to access other tools. Depending on the model and shed layout, you may be able to use a suitable wheelbarrow holder or secure wall mounted support. Never suspend heavy equipment from a hook that isn’t rated for its weight. Keep the wheelbarrow stable and prevent it from rolling or tipping into nearby supplies.
Lidded Soil Containers

BEFORE
Open bags of potting mix can split, spill or spread dust across the floor. Loose soil may also become mixed with debris, while partially used bags are difficult to stack neatly.
AFTER
Suitable lidded containers keep growing media contained and make the storage area easier to clean. Clear labels help distinguish different mixes and sturdy containers can be arranged neatly on a low shelf.
Choose containers that suit the type and amount of material you store, and follow the product’s storage instructions. Keep growing media dry when required, but don’t seal wet material if doing so could encourage unwanted conditions. Place heavier containers close to the ground and use a dedicated scoop for each material if cross-contamination is a concern. Store soil products away from children, pets and food.
Garden Calendar Station

A small calendar station helps connect storage with the gardening tasks you’re planning to complete. Mark sowing dates, transplanting reminders, pruning windows and supply needs in one visible place. A monthly calendar is useful for broader planning, while a small whiteboard can hold the jobs you want to finish this week.
Mount the station near your potting bench or seed organizer so it is easy to consult while working. Keep a pencil and a few blank plant labels nearby and review the list when the season changes. This doesn’t need to become a complicated record keeping system. A simple, regularly updated calendar can help prevent forgotten tasks and make better use of the supplies already in your shed.
Foldable Garden Chairs

DO
- Fold chairs fully before storing them.
- Use a suitable wall bracket or stable floor position.
- Keep chairs away from sharp tools and heavy equipment.
- Check that hinges and locking mechanisms work properly.
DON’T
- Don’t stack chairs in a way that could cause them to topple.
- Don’t block the entrance or main walkway.
- Don’t hang heavy chairs from unsuitable hooks.
- Don’t store wet cushions in sealed containers.
Folding chairs are useful for breaks, garden gatherings and occasional outdoor projects, but they can take up unnecessary space when left open. A designated storage position keeps them accessible without competing with daily gardening supplies. If your chairs have removable cushions, store those separately in a clean, dry place according to the manufacturer’s care instructions.
Door-Mounted Organizers
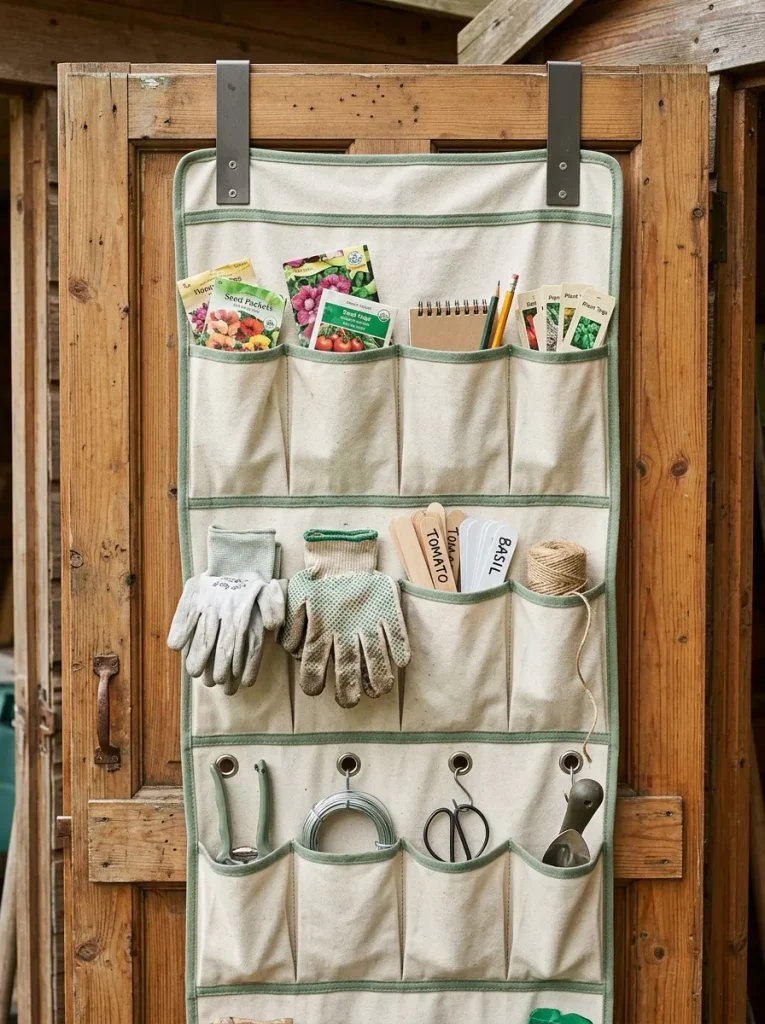
Quick Tip:
Before installing an over-door organizer, check the door’s construction, clearance and weight limits. Choose shallow pockets for lightweight accessories so the organizer doesn’t interfere with closing the door.
Door-mounted storage makes use of an area that often remains empty. It works well for gloves, small packets, labels and other light items you need regularly. Use a purpose-built organizer or suitable hooks that won’t damage the door, and avoid putting heavy metal tools or sharp equipment in loose pockets. Keep the door’s hinges and latch unobstructed and make sure stored items cannot fall when the door swings open or shut.
Dedicated Cleaning Station
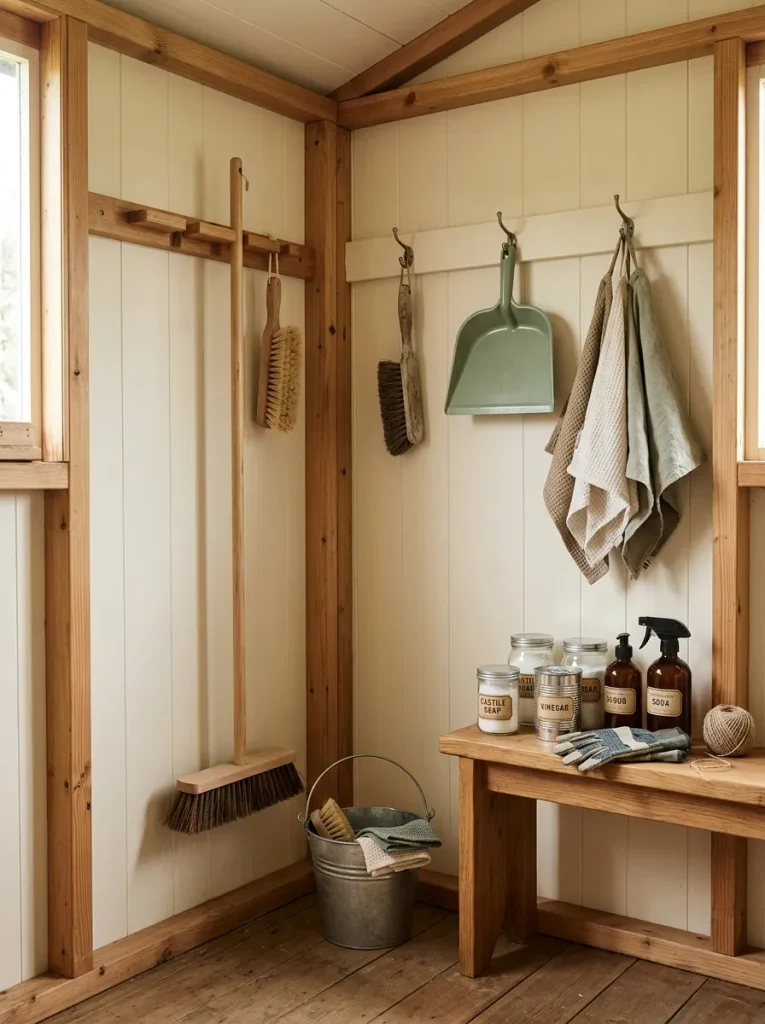
Cost: Low to moderate, depending on the holders and containers you already own.
Space: A narrow wall section or one compact corner.
Best For: Brushes, dustpans, cloths and everyday shed cleanup supplies.
Maintenance: Return each item to its holder after use and remove dirt regularly.
A dedicated cleaning station makes it easier to tidy the shed after potting, pruning, or handling soil. Keep a small brush and dustpan within reach, with cleaning products stored safely in their original containers. Separate cleaning equipment from seed packets and planting supplies and follow product safety instructions. A quick sweep after each gardening session helps stop soil, leaves and debris from spreading across shelves and walkways.
Labeled Seasonal Boxes
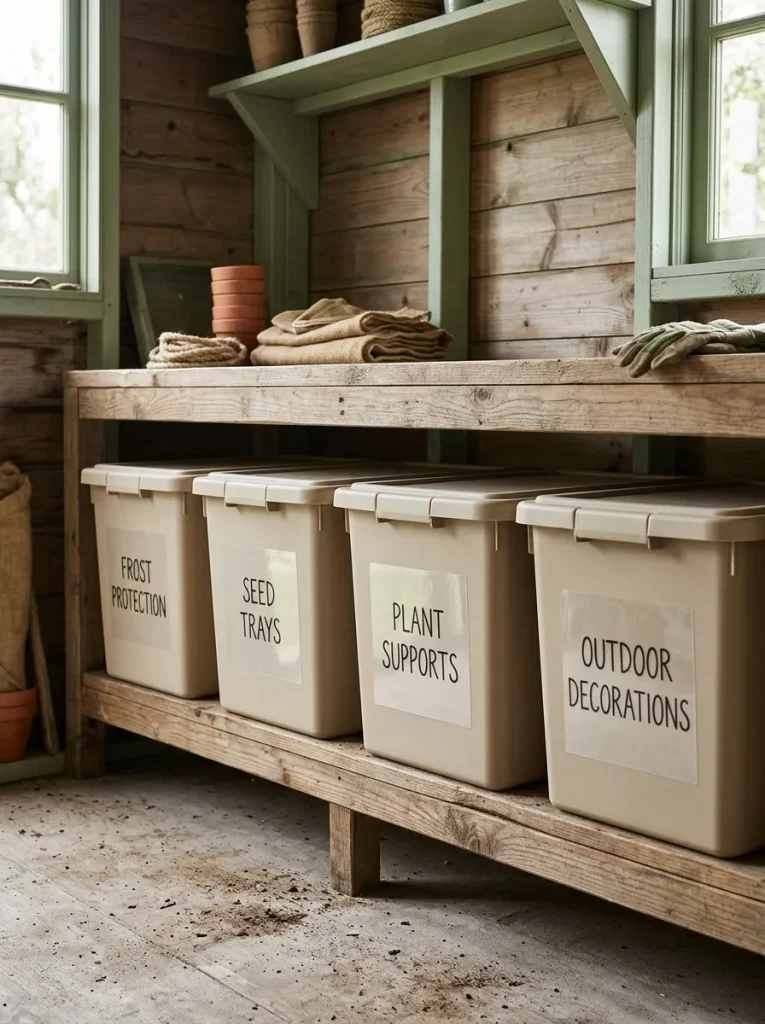
Seasonal supplies often sit unused for months, taking up valuable space near everyday tools. Labeled boxes allow you to group these items together and keep them out of the way until the right time of year. Choose durable containers that suit the shed’s conditions and label each box with its main contents rather than a vague description.
Keep the current season’s supplies on an accessible shelf and move less frequently used boxes to a higher or more distant location, provided they remain safe to retrieve. Before storing items, remove dirt and allow reusable equipment to dry. Review the boxes when the season changes so damaged supplies and items you no longer need don’t remain in storage indefinitely.
Weekly Shed Reset

DO
- Return each tool to its assigned hook or shelf after use.
- Sweep loose soil and leaves from the floor.
- Check that damp gloves and equipment can dry properly.
- Restock small supplies when you notice they’re running low.
DON’T
- Don’t leave tools scattered on the workbench overnight.
- Don’t put wet items into closed containers.
- Don’t keep broken pots or unusable equipment indefinitely.
- Don’t let empty packaging accumulate in storage corners.
Even a well-designed shed can become cluttered again without a simple maintenance routine. Set aside a few minutes each week to return misplaced items, clean the work surface and check the supplies you use most. You don’t need to reorganize everything every time you garden. Small, consistent resets help preserve the system you’ve created and keep your shed ready for the next planting project.
Conclusion
An organized garden shed makes gardening more enjoyable, saves valuable space and helps you spend less time searching for tools and supplies. With these Garden Organization Ideas, you can create a practical storage system that suits your needs, whether you’re working with a tiny shed or a spacious garden workspace.
Start with one simple improvement, such as adding labeled bins, hanging frequently used tools, or creating a dedicated potting area. Build on those changes as you discover what works best for your routine. Remember to return items to their proper places and give your shed a quick weekly reset.
Save this article on Pinterest for inspiration, try your favorite ideas and share it with someone who could use a tidier garden shed.



One Comment